Saturday 31 October 2015

Halloween makeup- clown


Hey guys!! So here is the final of my week load of halloween make up ideas, saving the best till last, this is actually a lot easier than you would think, but it does take time and patience!!

You will need- White face paint, bright eye shadow- yellow, pink and purple, pencil and liquid eye liner- or back face paint.

Step 1- make sure your skin is moisturised, because the face paint will dry your skin out! Then, using your white face paint, put it all over your face (you could also take it down your neck too if you want to go all out clown style). Next, get your yellow eye shadow and cover your eye lids in this lovely bright colour..!


Step 2- Using your pink eye shadow, brush this under your eyes in a half moon- like shape, going slightly onto your cheeks. 

Step 3- Get your purple eye shadow and add this on top of the pink to add more colour and depth, creating an ombre look. 

Step 4- Get your black pencil eye liner and draw a rounded triangle on to the end of your nose and fill it in with the liquid eye liner (or black face paint if you have it).

Step 5- using the eye liner/ black face paint again, paint your lips with it, i went slightly over my lip shape to make this mouth part look bigger, then from the corners of your mouth to a 'big flick' as you would an eye liner wing going up on to your cheeks- as much as you want. Then using the white face paint again, put little blogs of it on to the lips and nose to highlight them.


Step 6- this is the tricky part- which is really hard to explain so its easier copying it from the photo if I'm honest, but to create the top part of the eye make up, you need to draw a line just above the crease in your eyelid and kind of draw a triangular shape up through your eye brow to your forehead and colour this in black. Then add your normal winged eyeliner, slightly heavier than you usually would and make sure the wing is big. For the bottom part you also need to draw a triangular shape under your eye bringing the middle bit down to your cheek, at the end of each 'flick' add a little dot. 

Finished! The eye section is really hard to explain how to do, so i hope you understood it ok!

This is my favourite look that i have created out of the 7 that i have posted about. i hope you have been able to follow them all ok and have enjoyed these different to usual posts, i know i have!

Have a fun halloween and i will see you next week with a post most likely about an outfit that i have worn!If you have any requests on what you would like to see me blog about please do let me know!

See you next week!

emillie
xoxo


Friday 30 October 2015

Halloween makeup- half green zombie


Hey guys, so this is the second to last halloween makeup tutorial that i will be doing this year! This one is zombie inspired and is sooo easy to do! As you can probably tell from my previous make up designs, i like the half face kinda look as i think it has more of a glamorous feel to it compared to a full face of makeup/ face paint.

You will need- two shades of green eyeshadow/ face paint, red lipstick, fake blood, your normal make up, including eyeliner (if eyeliner is not in your normal day to day makeup bag).

Step 1- using eyeliner, draw a similar shape to the one i have done on one side of your face, going further to the other side on your forehead. To go all out with this look, i would suggest going down your neck/ chest with this shape to make it look more zombie like. 


Step 2- using the lighter of the green eye shadow/ face paint, fill in the shape you have just made with the eye liner, and if your doing it down your neck too, don't forget to fill that in also!  

Step 3- Using the darker of the greens now, this will create shadow and structure to your face. Use it as you would if you were contouring your cheek bone, and add it around the edge of the eyeliner shape, making bits darker that others- like i have done to my nose, chin and forehead.


Step 4- getting your eye liner again, put it on heavily to your top eye lid, creating a big wing, also add it under your eye to really make your eye stand out. Then, using the eyeliner again, create lines on your eye lid going towards your eye brow creating big eye lashes. This makes your eye look really big compared to the other one!


Step 5- Colour your eye brow in with a darker shade than you usually would, (i have a palette of brown and black, i usually use the brow so for this i used the black) and make the brow slightly chunkier than you usually would too. Getting your red lipstick, cover you lips as you usually would. Get you eyeliner again, and go back around the shape you originally made adding little crosses to make it look sewn on. Using either a darker shade of lipstick or eyeliner, shade in the corner of your mouth that is in the green area, adding depth and darkness to your top and bottom lip, and flick the edge out as you would winged eye liner, this will create a slightly different shape to your mouth compared to the 'normal' side of your face. 


Step 6- do your normal makeup on the 'non green' side of your face and make sure you go around the green shape you have made to make sure your skin is even all over (obviously except the green section). For this side, i decided to make my make up quite natural looking so it makes the green part stand out more.


Step 7- Finally, get your fake blood and drip it from your eye/ eye brow or where ever you want it- you can totally skip this stage if you prefer the look with out the blood. To really finish this look off, get yourself some red/ white/ black contact lenses and use them just in the green side eye!

DA DAAARH!

I hope you have enjoyed and found today's guide easy to follow, if you have any questions, as ever, feel free to contact me or leave me a comment below.

Tomorrows post is going to be on my favourite look that i have tried.. saving the best till last right!

See you tomorrow guys!

emillie
xoxo


Thursday 29 October 2015

Halloween makeup- robot


Hey guys!! So i have been really enjoying doing these halloween make up ideas, its something different to my normal fashion posts and will probably only happen at this time of year! 

So today's look is inspired by a robot where it looks like the skin has been scratched to reveal the metal underneath. This look us created by using simple day to day makeup and fake blood. For this you will need- liquid/ pencil eyeliner, silver and grey eye shadow and fake blood (and your normal makeup for the rest of your face). 

Step 1- put on your normal makeup, foundation mascara- the lot, then using eyeliner draw jaggedy lines (like i have), this will create the basic look.


Step 2 - using the darker of the two eye shadows, fill in the shapes you have just made.


Step 3- using your eyeliner again, make similar lines and dots to the ones i have done to create the nut & bolt metal look.


Step 4- using the lighter eye shadow that you have, use it as a highlighter so make the 'metal' look more shiny and realistic.


Step 5- Finally, using the fake blood and a thin make up brush/ paint brush, paint around the 'metal' and on the side towards the middle of your face brush the blood towards your nose, this will make it look more scratched. Add extra lines to add smaller scratches.


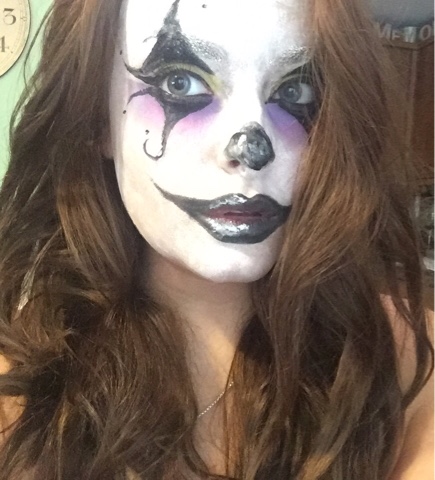
FINISHED! So this look is now finished, i haven't put on much make up so to really finish this look off i would go all out with smokey eyes, winged eyeliner red or metalic lipstick and contact lenses. 

Have fun!!!

See you tomorrow!

emillie 
xoxo

Wednesday 28 October 2015

Halloween makeup- stitched up


Hey guys, I hope you have found my previous tutorials helpful and enjoyable! So this is the easiest halloween make up design that i have done, its not my favourite but i think it is really effective and would look even better with the right outfit and maybe red contact lenses.

Step 1- put on your normal makeup (i haven't done this stage as you can tell) and using eyeliner draw lines in random areas on your face, this will create the depth of the stitching,
Step 2- using fake blood, and a paint brush/ thin makeup brush go over the eyeliner lines and add little 'stitch' marks on each of these lines. 

Final stage! After i did stage 2, i decided i wanted a few extra stitch marks so i simply added them in after to my eyebrow, lips and chin, i also covered my lips in the fake blood, you can also use red lipstick to do this. As i said before, i haven't put my normal makeup on so to finish this look, make sure you have you eye make up on and contact lenses would really make this look pop!

As i have also said, this is the easiest tutorial that i have done so enjoy!
See you tomorrow!

emillie
xoxo


Monday 26 October 2015

Halloween makeup- doll

Hey guys, so I really hope you are enjoying these Halloween makeup tutorials that I am doing, bare in mind that I am NOT a makeup pro so they're not the best but I think I have done pretty well considering its only basic makeup I am using! Anyway... todays makeup is a creepy doll which  is so easy to do and so effective!

Step 1- put your normal foundation on and mascara on your top lashes- not the bottom ones and put on winged eyeliner and using a pencil eyeliner draw a semi circle under your eyes and fill It in with white face paint.
Step 2- under the semi circle lines, do lots of little lines to create the under lashes. Put on the brightest blusher that you own to make very rosy cheeks. For this next part I used a brown eye brow pencil to create the freckles on each cheek, for this stage you can do how ever many dots you desire! Then draw on your eye brows- bigger and darker than you would normally have them.

Stage 3- LIPS- using your white face paint, cover the whole bottom lip in it, going over the bottom edge to make your bottom lip look much bigger, this will be the base for your top set of teeth.

Under the white bottom lip, using eyeliner/ black face paint, draw another lip shape as big/ small as you want as this will be the darkness between the top and bottom teeth.
Then and another layer of white paint under the black to create the bottom set of teeth, this should be a similar size to the top white shape. These stages should be going down your chin to create the large mouth look.
The next stage is to get your bright red lipstick, the brighter the better I think and cover your top lip like you normally would with lipstick, and the outline the white and black shapes you have just made and make the bottom part thicker as this will be your bottom lip.


The final mouth stage is to draw lines down the mouth like I have above- this creates the teeth, they should be about 1cm wide- but this size is totally up to you. After this, from the corners of your mouth, using eyeliner, draw a line down to the bottom of your chin, this creates the puppet like mouth element.
FINISHED!! So easy right and really effective!


So I hope you have enjoyed this tutorial and find it easy to follow!
See you tomorrow!
Good luck & enjoy!

emillie
xoxo


Sunday 25 October 2015

Halloween makeup- pop art

Hey guys!! I hope you enjoyed yesterdays skull post, this is another idea for Halloween but less scary and very easy!
So step 1, put on your normal makeup- foundation, bronzer, blusher, mascara then use a brightly coloured eyeshadow- I used green and yellow as it stands out, then put your eyeliner on.
The next step is to colour in your eyebrows- the darker the better and make them bigger than you normally do, then choose a bright lipstick, the one I'm using is 'girl about town' by mac and this will be the base colour for your next step.
Step 3- use eyeliner and make little lines on your face, like I have. This will create more shape and structure to your face. Then using eyeliner again, draw around your lips, flicking it out at both ends, using black eye shadow, shade in the corners of your lips making them look bigger and bolder, then using white face paint add little bits to the centre of each lip to make it look like light is hitting them, making them look even bigger and in your face! (close up below)
                                                                                                                                                                                                     
Step 4- using the white face paint, add white dots all over your face finishing this pop art look off, I used the end of a brush to create these as it was the perfect size for the dots.
The final step is to draw a tear shape under which ever eye you want, use eyeliner to do this, and colour in the shape you have made in blue eye shadow.
DAH DARRH! Finished!


I hope you have enjoyed this tutorial, see you again tomorrow with my third halloween makeup idea and check out my instagram for more photos and videos on these!

Enjoy!

emillie
xoxo